
Oyakodon is a comforting and delicious Japanese dish that combines tender pieces of chicken and soft eggs simmered in a savory dashi stock. This mixture is then served over a bowl of steaming rice, creating a harmonious blend of flavors and textures. It's a quick and satisfying meal that's perfect for any time of the day.
Some ingredients in this recipe might not be commonly found in every household. Dashi stock is a Japanese soup base made from dried fish and seaweed, which can be found in the Asian section of most supermarkets or specialty stores. Mirin is a sweet rice wine used in Japanese cooking, also available in the Asian aisle. These ingredients are essential for achieving the authentic flavor of Oyakodon.
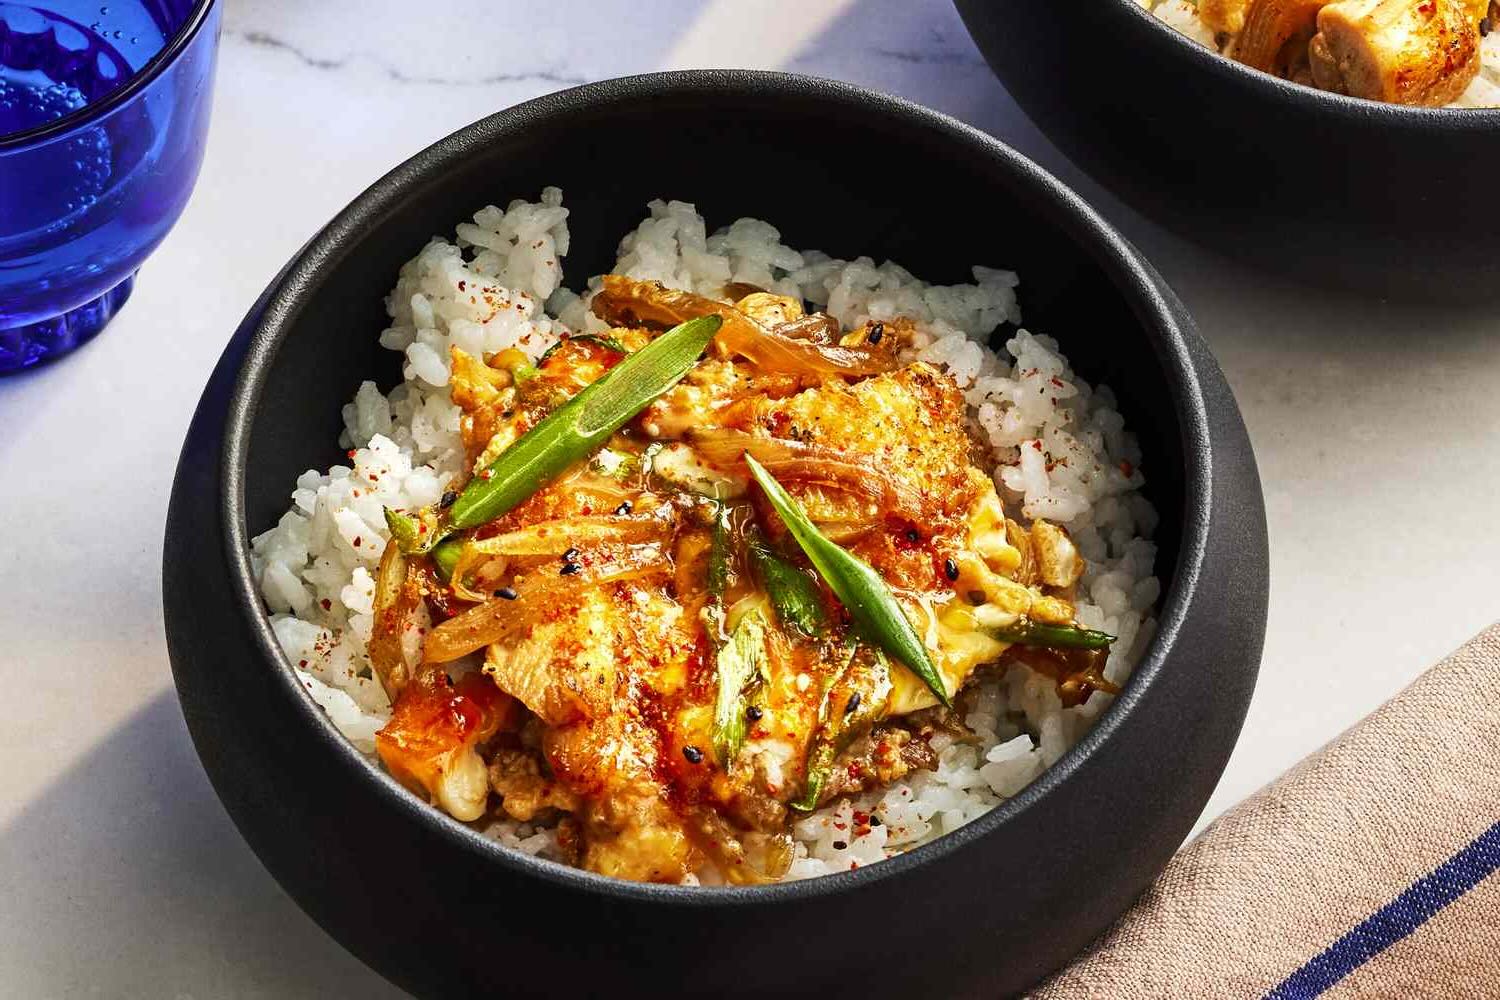
Ingredients For Oyakodon Japanese Chicken And Egg Rice Bowl
Rice: The base of the dish, providing a neutral backdrop for the flavorful toppings.
Chicken thigh: Cut into bite-sized pieces, it adds protein and a rich taste.
Onion: Thinly sliced, it adds sweetness and depth to the dish.
Eggs: Beaten and poured over the chicken and onion mixture, they create a creamy texture.
Dashi stock: A Japanese soup base that adds umami flavor.
Soy sauce: Adds saltiness and depth to the dish.
Mirin: A sweet rice wine that balances the flavors.
Sugar: Adds a touch of sweetness to the savory mixture.
Technique Tip for This Recipe
When preparing oyakodon, ensure that the chicken thigh pieces are cut uniformly. This allows them to cook evenly and ensures that each bite is tender and juicy. Additionally, when pouring the beaten eggs over the chicken and onion mixture, do so gently and in a circular motion to distribute the eggs evenly. This technique helps create a delicate, custard-like texture that is characteristic of a well-made oyakodon.
Suggested Side Dishes
Alternative Ingredients
Cooked rice - Substitute with quinoa: Quinoa provides a similar texture and is a healthier alternative with more protein and fiber.
Chicken thigh - Substitute with tofu: Tofu is a great vegetarian alternative that absorbs flavors well and provides a similar texture.
Thinly sliced onion - Substitute with leeks: Leeks offer a milder flavor and similar texture when cooked.
Beaten eggs - Substitute with silken tofu: Silken tofu can mimic the texture of eggs and is a good vegan alternative.
Dashi stock - Substitute with vegetable broth: Vegetable broth can provide a similar umami flavor, especially when enhanced with a bit of seaweed or mushroom.
Soy sauce - Substitute with tamari: Tamari is a gluten-free alternative that offers a similar salty and umami flavor.
Mirin - Substitute with rice vinegar and sugar: Mix rice vinegar with a bit of sugar to mimic the sweet and tangy flavor of mirin.
Sugar - Substitute with honey: Honey can provide a similar sweetness with a slightly different flavor profile.
Other Alternative Recipes Similar to This Dish
How to Store or Freeze This Dish
- Allow the oyakodon to cool to room temperature before storing. This helps prevent condensation, which can make the dish soggy.
- Transfer the chicken and egg mixture into an airtight container. Ensure it is well-sealed to maintain freshness.
- Store the cooked rice separately in another airtight container. This prevents the rice from absorbing too much moisture from the chicken and egg mixture.
- Place both containers in the refrigerator if you plan to consume the dish within 2-3 days. For longer storage, proceed to freezing.
- To freeze, label the containers with the date to keep track of freshness. This is especially useful for meal planning.
- When ready to reheat, thaw the oyakodon in the refrigerator overnight if frozen. This ensures even reheating.
- Reheat the chicken and egg mixture in a saucepan over medium heat, stirring occasionally until heated through. Alternatively, use a microwave-safe dish and heat in short intervals, stirring in between.
- Reheat the cooked rice separately in the microwave or on the stovetop. Add a splash of water to the rice before reheating to restore its fluffy texture.
- Once both components are heated, assemble the oyakodon by placing the chicken and egg mixture over the rice. Enjoy your delicious meal!
How to Reheat Leftovers
Stovetop Method:
- Place the leftover oyakodon in a non-stick skillet.
- Add a splash of dashi stock or water to prevent drying out.
- Cover the skillet with a lid and heat over medium-low heat.
- Stir occasionally until the chicken and eggs are heated through.
- Serve immediately over fresh rice.
Microwave Method:
- Transfer the oyakodon to a microwave-safe dish.
- Sprinkle a few drops of water or dashi stock over the top.
- Cover the dish with a microwave-safe lid or plastic wrap, leaving a small vent.
- Microwave on medium power for 1-2 minutes, stirring halfway through.
- Ensure the chicken and eggs are evenly heated before serving.
Oven Method:
- Preheat your oven to 350°F (175°C).
- Place the oyakodon in an oven-safe dish.
- Add a small amount of dashi stock or water to keep it moist.
- Cover the dish with aluminum foil.
- Bake for about 10-15 minutes, or until the chicken and eggs are thoroughly heated.
- Serve over freshly cooked rice.
Steaming Method:
- Place the oyakodon in a heatproof dish that fits into your steamer.
- Add a little dashi stock or water to the dish.
- Steam over boiling water for about 5-7 minutes.
- Check to ensure the chicken and eggs are heated through.
- Serve immediately over rice.
Sous Vide Method:
- Place the oyakodon in a vacuum-sealed bag or a zip-lock bag using the water displacement method.
- Set your sous vide machine to 140°F (60°C).
- Submerge the bag in the water bath and heat for about 30 minutes.
- Remove from the bag and serve over freshly cooked rice.
Best Tools for This Recipe
Saucepan: Used to simmer the dashi stock, soy sauce, mirin, and sugar mixture, and to cook the chicken and onion.
Rice cooker: Ideal for cooking the rice according to package instructions.
Cutting board: Provides a safe surface for cutting the chicken thigh and slicing the onion.
Chef's knife: Essential for cutting the chicken into bite-sized pieces and slicing the onion thinly.
Measuring cups: Used to measure the dashi stock and cooked rice accurately.
Measuring spoons: Used to measure the soy sauce, mirin, and sugar precisely.
Mixing bowl: Used for beating the eggs before adding them to the saucepan.
Whisk: Helps in beating the eggs evenly.
Wooden spoon: Useful for stirring the ingredients in the saucepan.
Ladle: Handy for serving the chicken and egg mixture over the cooked rice.
How to Save Time on Making This Recipe
Prep ingredients ahead: Cut the chicken and onion in advance and store them in the fridge.
Use instant dashi: Opt for instant dashi stock to save time on making it from scratch.
Cook rice in a rice cooker: Set the rice cooker and let it handle the cooking while you prepare other ingredients.
Simmer together: Combine dashi stock, soy sauce, mirin, and sugar in one go to streamline the process.
Quick egg setting: Pour the beaten eggs over the hot mixture and cover with a lid to set quickly.
Oyakodon (Japanese Chicken and Egg Rice Bowl) Recipe
Ingredients
Main Ingredients
- 1 cup rice cooked
- 200 g chicken thigh cut into bite-sized pieces
- 1 onion thinly sliced
- 2 eggs beaten
- 1 cup dashi stock
- 2 tablespoon soy sauce
- 2 tablespoon mirin
- 1 tablespoon sugar
Instructions
- 1. Cook the rice according to package instructions and set aside.
- 2. In a saucepan, combine dashi stock, soy sauce, mirin, and sugar. Bring to a simmer.
- 3. Add the sliced onion and chicken pieces to the saucepan. Cook until the chicken is done.
- 4. Pour the beaten eggs over the chicken and onion mixture. Cook until the eggs are just set.
- 5. Serve the chicken and egg mixture over the cooked rice.
Nutritional Value
Keywords
Suggested Appetizers and Desserts for This Recipe
More Amazing Recipes to Try 🙂
- Japanese Sesame Paste (Nerigoma) Recipe15 Minutes
- Takoyaki (Japanese Octopus Ball) Recipe30 Minutes
- Japanese Chicken Stew Recipe1 Hours
- Japanese Baked Fish Recipe30 Minutes
- Japanese Dry Curry Recipe45 Minutes
- Teppanyaki Recipe35 Minutes
- Japanese Soybean Powder (Kinako) Recipe25 Minutes
- Japanese Kimbap Recipe35 Minutes
Leave a Reply